Best Guide to Enable Windows NTP Server Policy using Intune
How to Enable Windows NTP Client Using Intune?
Today we will go through Intune Add NTP Client For Windows, Network Time Protocol (NTP) is a protocol used to synchronize the clocks of computers and other devices on a network. It’s essential for ensuring that various devices within a network maintain accurate and synchronized time
Time is a precious resource that governs our lives. From meeting deadlines to catching your favorite TV show, every aspect of our daily routine relies on the accurate measurement of time. For Windows users, ensuring that their device’s time is synchronized accurately is crucial. In this article, we’ll explore how to enable Windows NTP (Network Time Protocol) client using Intune, simplifying a process that’s often overlooked but vitally important.
Table of Contents
- Introduction to NTP – Understanding the Importance of Time
- Why Windows NTP Client Matters – The Role of Windows in Timekeeping
- Getting Started with Intune – Preparing for Configuration
- Configuring Windows NTP Client via Intune – Step-by-Step Guide
- Testing the Synchronization – Verifying Your Settings
- Common Issues and Solutions – Troubleshooting Time Problems
- Keeping Your System Secure – NTP Security Measures
- Benefits of NTP Synchronization – Beyond Accurate Time
- Frequently Asked Questions (FAQs) – Your Queries Answered
- What is NTP, and why is it essential for Windows?
- Can I manually configure NTP settings on Windows?
- Are there any risks associated with incorrect time settings?
- Does NTP synchronization affect my device’s performance?
- Can I use Intune for NTP configuration on older Windows versions?
Introduction to NTP
Time is an intangible, yet indispensable element of our daily lives. We rely on it to schedule our appointments, catch flights, and ensure our favorite TV shows start on time. Just as a conductor keeps an orchestra in harmony, time orchestrates our activities. But have you ever wondered how your computer keeps time?
Enter NTP, or Network Time Protocol. NTP is the unsung hero that ensures your computer’s clock is always in sync with the correct time. It’s like the invisible conductor that keeps your digital orchestra in perfect harmony.
Why Windows NTP Client Matters
Now, you might be thinking, “Why does my Windows computer need to be so precise with time?” Well, the answer is simple: accuracy matters in the digital world. Everything from sending emails to troubleshooting network issues relies on precise timekeeping.
Imagine if your computer thought it was December when it’s actually June. Chaos would ensue! Emails would be timestamped incorrectly, and your online transactions might fail due to the discrepancy in timestamps. This is where Windows NTP client comes into play, ensuring your computer’s clock is always right on the money.
Getting Started with Intune
Before we delve into configuring the Windows NTP client, let’s get prepared. We’ll be using Intune for this task, so make sure you have access to an Intune-managed device. If you don’t have Intune set up yet, it’s time to do so.
- Sign in to Intune: Access your Intune account using your admin credentials.
- Add Devices: Ensure that your target Windows device is added to the Intune portal.
- Intune Configuration: Familiarize yourself with the Intune dashboard and navigation.
Configuring Windows NTP Client via Intune
To Enable Windows NTP Server Policy Using Intune, follow the steps stated below: Sign in to the Intune Admin Center portal https://intune.microsoft.com/. Select Devices > Windows > Configuration profiles > Create a profile.
Now that you’re all set up with Intune, let’s dive into configuring your Windows NTP client. Follow these steps to ensure your computer’s clock is always ticking in harmony with the world:
- Access the Intune Portal: Log in to your Intune portal and navigate to ‘Device Configuration.’
- Create a New Configuration Profile: Click on ‘Profiles’ and then ‘Create Profile.’ Name it something like ‘NTP Configuration.’
- Configuration Settings: In the ‘Settings’ section, select ‘Custom’ and add a new OMA-URI setting. This is where the magic happens.
- Configure NTP: In the OMA-URI settings, input the following:
- OMA-URI: ./Device/Vendor/MSFT/Policy/Config/TimeLanguageSettings/ConfigureNTPServer
- Data Type: String
- Value: Enter your preferred NTP server (e.g., time.windows.com)
- Assign Profile: Once you’ve configured the settings, assign the profile to your target Windows device.
I am referring all the configuration FIGURE screenshot for more clarity.
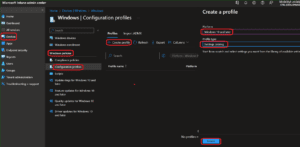
1: Select Devices > Windows > Configuration profiles > Create a profile.
In Create Profile, I select Windows 10 and later in Platform and select Profile Type as Settings catalog. Click on Create button.
 Intune Add NTP Client For Windows Fig.1
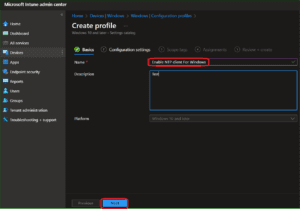
2: Provide a name for the policy as “Enable Windows NTP Client Policy
 Intune Add NTP Client For Windows Fig.2
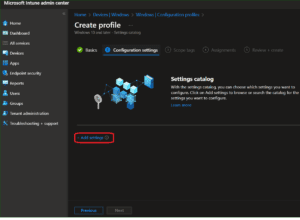
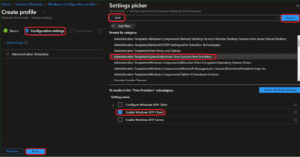
3: Configuration Settings, click Add Settings to browse or search the catalog for the settings
 Intune Add NTP Client For Windows Fig.3
4: I see the sub-category TIME Providers and Enable Windows NTP Client.
 Intune Add NTP Client For Windows Fig.4
5: Kept the Enable Windows NTP Client as Enabled in the Administrative Templates then click next to continue
 Intune Add NTP Client For Windows Fig.5
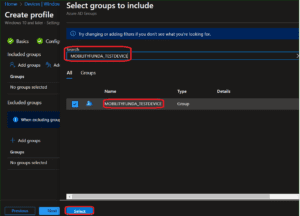
6: in Assignments, Included Groups, click on Add Groups, choose Select Groups to include and click Next to continue
 Intune Add NTP Client For Windows Fig.6
7: In the Review + Create tab, review all the settings. After clicking on Create, changes are saved, and the profile is assigned to the group.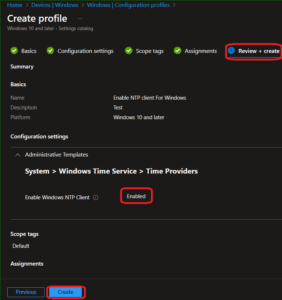 Intune Add NTP Client For Windows Fig.7
After successfully creating the “Enable NTP Client For windows“ notification will appear in the top right-hand corner, confirming the action.
Testing the Synchronization
You’ve set up NTP configuration via Intune, but how do you know it’s working? Let’s put it to the test:
- Check the Time: On your Windows device, check the system time before and after the configuration. You should notice a difference if it was out of sync.
- Restart Your Device: Sometimes, a restart is necessary for the changes to take effect.
- Verify Synchronization: After the restart, check the system time again. It should now be synchronized with your chosen NTP server.
Common Issues and Solutions
As with any technology, issues can crop up. Here are some common problems you might encounter while configuring Windows NTP client via Intune, along with solutions:
- Incorrect NTP Server: If your time isn’t synchronizing, double-check that you’ve entered the correct NTP server address.
- Firewall Restrictions: Ensure that your firewall allows outgoing NTP traffic, or the synchronization won’t work.
- Device Not Assigned: If your device isn’t getting the configuration, verify that you’ve assigned the profile correctly in Intune.
Keeping Your System Secure
While configuring NTP is essential, it’s equally vital to consider security. Here are some tips to keep your system secure while using NTP:
- Update Regularly: Ensure your Windows device is up to date with the latest security patches.
- Use Secure NTP Servers: Choose reputable and secure NTP servers to minimize security risks.
- Firewall Rules: Implement strict firewall rules to allow only trusted NTP traffic.
Benefits of NTP Synchronization
Now that you’ve mastered Windows NTP client configuration let’s explore the benefits that come with accurate time synchronization:
- Efficient Operations: Accurate timekeeping ensures that all your digital operations run smoothly and on schedule.
- Improved Security: Precise time helps in secure authentication and authorization processes.
- Troubleshooting Made Easy: When all devices have synchronized time, troubleshooting network issues becomes much more straightforward.
Frequently Asked Questions (FAQs)
What is NTP, and why is it essential for Windows?
NTP, or Network Time Protocol, is essential for Windows because it ensures that your computer’s clock is always synchronized with the correct time. This accuracy is crucial for various digital operations and prevents issues like incorrect timestamps on emails and transaction failures.
Can I manually configure NTP settings on Windows?
Yes, you can manually configure NTP settings on Windows, but using Intune simplifies the process and ensures uniform configuration across multiple devices.
Are there any risks associated with incorrect time settings?
Yes, incorrect time settings can lead to various issues, including authentication failures, email timestamp discrepancies, and network synchronization problems.
Does NTP synchronization affect my device’s performance?
NTP synchronization has a negligible impact on your device’s performance. It’s a lightweight process that runs in the background to keep your clock accurate.
Can I use Intune for NTP configuration on older Windows versions?
Yes, Intune can be used for NTP configuration on older Windows versions as long as the device is supported by Intune and the required settings are available.